Posts Categorized “programming”

Use Go reflection to get func type information

Here is a small code snipped that demonstrates how to get type information from a func type in Go. I prints the information to the console. More information about reflection can be found at the great Go docs article The Laws of Reflection.

Code

package main

import (
  "fmt"
  "reflect"
)

type Multiplier func(x int, y int) int

func main() {
  m := Multiplier(Multipli)
  mType := reflect.TypeOf(m)

  fmt.Printf("name: %v\n", mType.Name())
  fmt.Printf("number of in args: %v\n", mType.NumIn())
  fmt.Printf("number of out args: %v\n", mType.NumOut())
  fmt.Printf("in arg 1 type: %v\n", mType.In(0).Name())
  fmt.Printf("in arg 2 type: %v\n", mType.In(1).Name())
  fmt.Printf("out arg 1 type: %v\n", mType.Out(0).Name())
}

func Multipli(x int, y int) int {
  return x * y
}

Prints

$ go run method.go
name: Multiplier
number of in args: 2
number of out args: 1
in arg 1 type: int
in arg 2 type: int
out arg 1 type: int

Gocheck, the missing test suite for Go

I always loved the fact that Go ships with a build in test runner that allows you to go test your application without any additional tools required. Although the simplicity of Go tests is high, the API doesn't allow you to create any suites with tear ups and tear downs. Stuff I usually use for integration tests. So I started using Gocheck today and I must say that I am in love! It has one of the best Go API's I've seen so far (ok, it shares the first place with the Gorilla Web Toolkit). Here are some examples of the features I enjoy!

Test suites

Bundle your tests and add state to them.

// Setup the test suite
var _ = Suite(&ApiIntegrationTestSuite{
  ProcessFilename: "httpcallback.io",
})

// The state for the test suite
type ApiIntegrationTestSuite struct {
  ProcessFilename string
  process         *os.Process
}

Test suites with set up and tear down

// Runs before the test suite starts
func (s *ApiIntegrationTestSuite) SetUpSuite(c *C) {
  var procAttr os.ProcAttr
  procAttr.Files = []*os.File{nil, os.Stdout, os.Stderr}
  procArgs := []string{"-config config.toml -port 8000"}
  process, err := os.StartProcess(s.ProcessFilename, procArgs, &procAttr)
  if err != nil {
    c.Errorf("Unable to start %s: %s", s.ProcessFilename, err.Error())
    c.Fail()
  }

  // Allow process to warm up
  time.Sleep(2 * time.Second)
  s.process = process

  c.Logf("Started %s, pid %v", s.ProcessFilename, process.Pid)
}

// Runs after the test suite finished, even when failed
func (s *ApiIntegrationTestSuite) TearDownSuite(c *C) {
  if err := s.process.Kill(); err != nil {
    c.Logf("Unable to kill %s: %s", s.ProcessFilename, err.Error())
  }
}

Tests come with set up and tear down

// Runs before the test starts
func (s *ApiIntegrationTestSuite) SetUpTest(c *C) {
  s.ResetDataContext()
}

// Runs after the test finished, even when failed
func (s *ApiIntegrationTestSuite) TearDownTest(c *C) {
  s.Flush()
}

Assert API

No more if err != nil's in your Go test code, but a decent assert API.

func (s *ApiIntegrationTestSuite) TestPing(c *C) {
  response, err := http.Get("http://api.localhost:8000/ping")
  c.Assert(err, IsNil)
  c.Assert(response.StatusCode, Equals, http.StatusOK)

  doc, err := GetBodyAsDocument(c, response)
  c.Assert(err, IsNil)

  c.Assert(doc["message"], Equals, "pong")
}

Skipping tests

var aws = flag.Bool("aws", false, "Include aws tests")

func (s *ApiIntegrationTestSuite) TestAwsProvisioning(c *C) {
  if *aws {
    c.Skip("-aws not provided")
  }
}

Support benchmark tests

func (s *ApiIntegrationTestSuite) BenchmarkPing(c *C) {
  // c.N contains the number of times to repeat
  // the benchmark test. This number is dynamicly
  // set by the Go test runner.
  for i := 0; i < c.N; i++ {
    response, err := http.Get("http://api.localhost:8000/ping")

    if err != nil {
      c.Fatalf("Error while getting response: %v", err.Error())
    } else {
      response.Body.Close()
    }
  }
}

Learn more

Read the gocheck introduction page to learn more about the framework and its benefits.

How auto deployment changed the way I blog

In a previous blogpost I described how I leverage wercker to automate the publishing and deployment process for this jekyll blog. Since then I have fixed typo's from my iPhone, used Prose for editing and introduced a staging area for my blog. The staging area helps me to review my posts in their final form, before I promote them production. You can expect a blogpost with the details somewhere soonish. In this post I want to share that wercker introduced auto-deploy and how enabling this feature changed the way I blog.

Auto deployment

Auto deployment allows you to flow your changes to production. It stimulates to break work into smaller predictable changes and therefor limits the risk of deployment. Before a change set flows to production it gets challenged by an automated build. The goals of the build is not only to transform the source code to a deployable form, but also to challenge its quality. This process allows teams to be more agile and it makes them more aware to spend time on the quality checks in the build.

Enabling auto deploy on wercker

A blog is a safe way to experiment with auto deployment. So I decided to enable it for both of my deployment targets, staging and production. Here is how my production deployment target looks like at wercker:

image

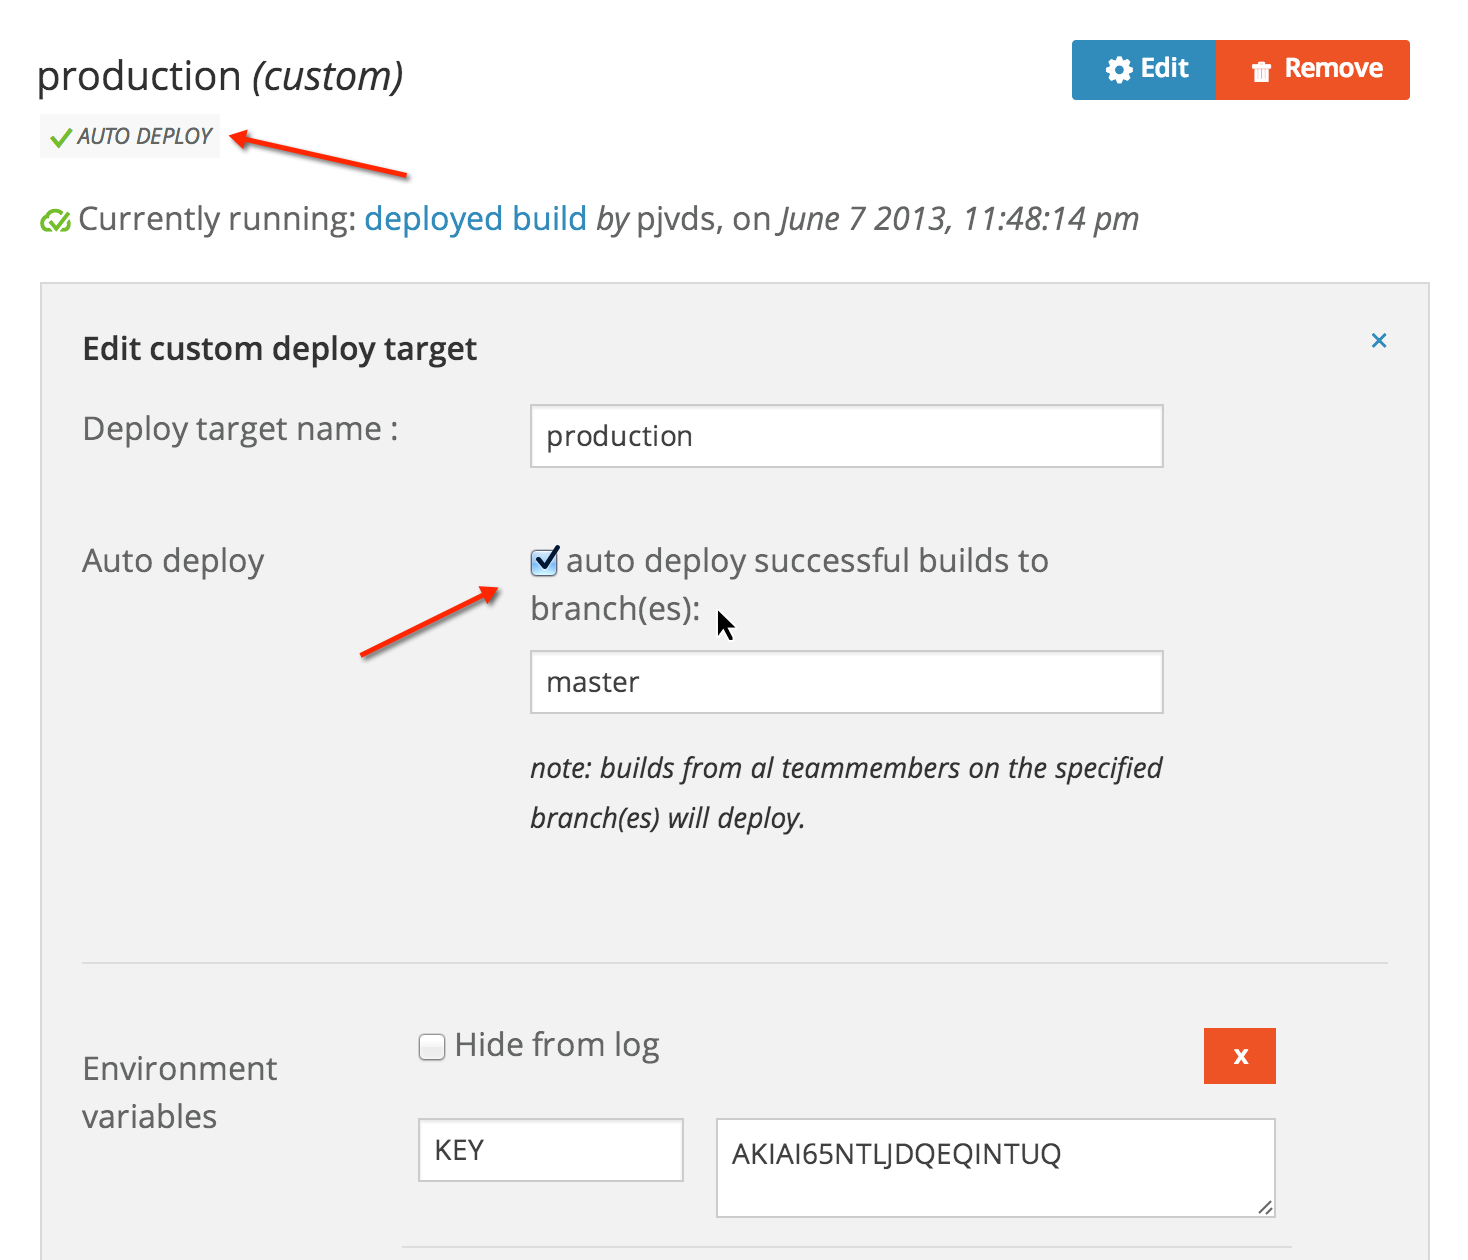
I enabled auto deploy for this target by checking the auto deploy checkbox. I configured it to only deploy successful builds from the master branch. All deployment targets that have auto deploy enabled show the auto deploy icon as you can see just below the deployment target name.

As described in a previous post, Wercker builds my website with every push to the Github repository. With the auto deploy feature enabled it will also deploy the build under the following conditions:

  • The build is successful (green), which means that jekyll generated the site successfully.
  • The build is from a branch that matches the auto deploy branch-list, in my case master.

How did this change my workflow

Before I enabled the auto deploy feature I was committing all my changes directly to the master branch. The two biggest downside of this are that finished and unfinished work are not separated and that the history of the master branch isn't really helpful. It contains to much details and one commit could be related to a post, the next to some improvements of a Jekyll plugin while the one before relates to some improvements in the template.

Now with auto deploy enabled I cannot work directly on the master branch anymore, because then I would deploy a bit too often. To have more control on what gets deployed and what not I decided to move to the feature branching model. This branching model allows me to work in an isolated branch until the work is complete.

Here is how I created this post. Before I started writing it, I created a branch called auto-deploy-jekyll. All the work got committed to that branch. These commits formed an audit trail that holds the exact path from the blank to the final state of the post. It contains not only textual changes but also the reasons behind important decisions. For example why I dropped a certain example or why I picked another screenshot. This is helpful for my future self and co-authors. It helps me to pick up where I left, especially when I do not work on a post for a couple of weeks.

After the is post is finished I merged it to the master branch and push the changes to Github. This push triggered a build at wercker and because the build was successful it it got auto deployed to production.

Advantages

  • Auto deploy forced me to isolate my work in to smaller branches that gave better focus.
  • The feature branches contain the full path to the final state of my work.
  • The feature branching model gave the master branch cleaner history.
  • Detailed history can be viewed in feature branches.
  • Higher level history can be viewed in the master branch.
  • The feature branches allow me to see the history of a certain paths. This is a big improvement over the history I had when I was committing directly to the master branch.
  • Master only contains production ready work.
  • Deployment gets as simple as a merge to master.