Deploying to Dokku
Jeff Lindsay created Dokku, the smallest PaaS implementation you've ever seen. It is powered by Docker and written in less than 100 lines of Bash code. I wanted to play with ever since it was released. This weekend I finally did and successfully deployed my application to Dokku running on an Digital Ocean droplet. In this post I share how you can do this as well. Of course I used to wercker to automate everything.
Prerequisites
First of all, to use dokku with wercker (as described here) you need:
- a github or bitbucket account,
- a wercker account,
- a digital ocean account,
- the wercker cli installed.
Add app to wercker
Fork the getting-started-nodejs sample application and clone it on a local machine.
$ git clone git@github.com:pjvds/getting-started-nodejs.git
Cloning into 'getting-started-nodejs'...
remote: Counting objects: 24, done.
remote: Compressing objects: 100% (19/19), done.
remote: Total 24 (delta 5), reused 17 (delta 1)
Receiving objects: 100% (24/24), done.
Resolving deltas: 100% (5/5), done.
Checking connectivity... done
With the wercker cli installed add the project to wercker
using the wercker create command (you can use the default options with any questions it will ask you).
$ cd getting-started-nodejs
$ wercker create
The wercker command should finish with something that looks like:
Triggering build
A new build has been created

Done.
-------------

You are all set up to for using wercker. You can trigger new builds by
committing and pushing your latest changes.

Happy coding!
Generate an SSH key
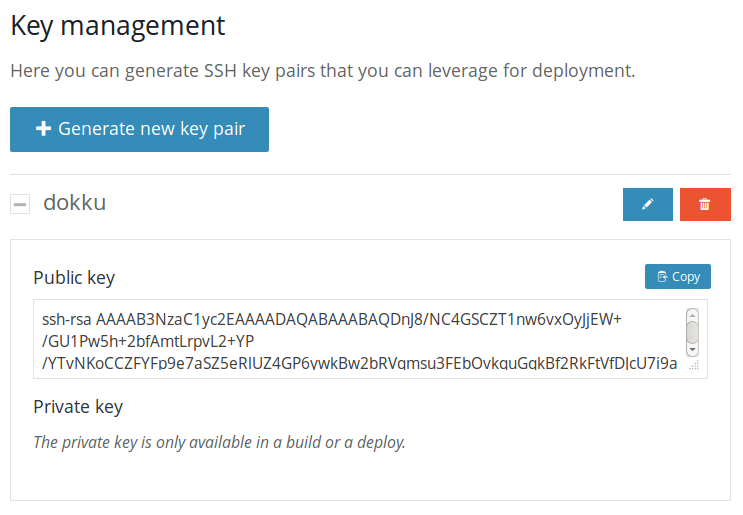
Run wercker open to open the newly added project on wercker. You should see a successfull build that was triggered during the project creation via the wercker cli. Go to the settings tab and scroll down to 'Key management'. Click the generate new key pair button and enter a meaningful name, I named it "DOKKU".
Create a Dokku Droplet
Now that we have an application in place and have generated an SSH key that will be used in deployment pipeline, it is time to get a dokku environment. Although you can run dokku virtually on every place that runs Linux, we'll use Digital Ocean to get the environment up and running within a minute.
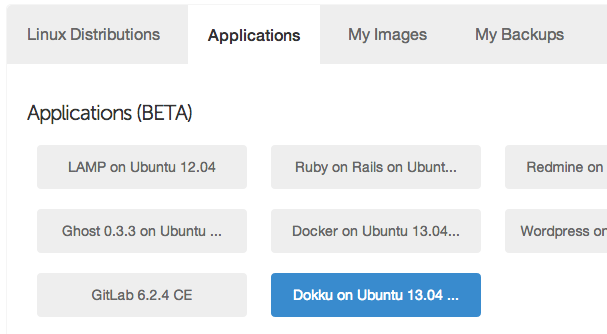
After logging in to Digital Ocean, create a new droplet. Enter the details of your liking. The important part is to pick Dokku on Ubuntu 13.04 in the applications tab.
Get the ip
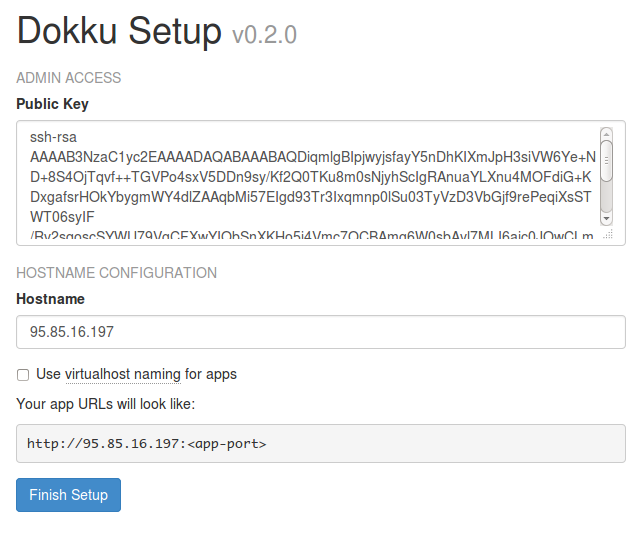
After the droplet is created, you'll see a small dashboard with the details of that droplet. Next, replace the public SSH key in the dokku setup with the one from wercker. You can find it in the settings tab of your project. Copy the public key from the key management section and replace the existing key. Next, copy the ip address from the dokku setup(you can find the ip address of it in the left top corner), we'll use it later. You can now click 'Finish setup'.
Create a deploy target
Go to the settings tab of the project on wercker, click on add deploy target and choose custom deploy target. Let's name it production and add two environment variables by clicking the add new variable button. The first one is the server host name: name it SERVER_HOSTNAME and set the value to the ip address of your newly created digital ocean droplet. Add another with the name DOKKU and choose SSH Key pair as a type. Now select the previously created ssh key from the dropdown and hit ok.
Don't forget to save the deploy target by clicking the save button!
Add the wercker.yml
We're ready for the last step which is setting up our deployment pipeline using the wercker.yml file. All we need to do now is tell wercker which steps to perform during a deploy. Create a file called wercker.yml in the root of your repository with the following content:
box: wercker/nodejs
build:
  steps:
    - npm-install
    - npm-test
deploy:
  steps:
    - add-to-known_hosts:
        hostname: $SERVER_HOSTNAME
    - add-ssh-key:
        keyname: DOKKU
    - script:
        name: Initialize new repository
        code: |
            rm -rf .git
          git init
          git config --global user.name "wercker"
          git config --global user.email "pleasemailus@wercker.com"
          git remote add dokku dokku@$SERVER_HOSTNAME:getting-started-nodejs
    - script:
        name: Add everything to the repository
        code: |
          git add .
          git commit -m "Result of deploy $WERCKER_GIT_COMMIT"
    - script:
        name: Push to dokku
        code: |
          git push dokku master
Add the file to the git repository and push it.
$ git add wercker.yml
$ git commit -m 'wercker.yml added'
$ git push origin master
Deploy
Go to your project on wercker and open the latest build, wait until it is finished (and green). You can now click the Deploy to button and select the deploy target we created earlier. A new deploy will be queued and you'll be redirected to it. Wait untill the deploy is finished and enjoy your first successfull deploy to a Digital Ocean droplet running dokku!